How to Use Silicone Glue for Strong and Lasting Repairs?
Silicone Glue is a versatile adhesive known for its strong bonding capabilities. It is widely used in various repair tasks, from household projects to intricate crafting. Its durability and flexibility make it a go-to choice for both professionals and DIY enthusiasts. When you apply Silicone Glue properly, it can withstand temperature changes and moisture, ensuring a long-lasting hold.
Using Silicone Glue effectively requires understanding its properties. You should clean the surfaces thoroughly before application. This helps achieve a strong bond. It’s important to note, however, that not all surfaces are compatible. Improper use may lead to weak adhesion. Take your time to ensure the surfaces are properly prepared.
Despite its advantages, mistakes can happen. Often, users apply too much glue, leading to messy results. Others might rush the drying process, jeopardizing the bond’s strength. These mistakes highlight the need for patience and careful application. With practice, you can master the use of Silicone Glue for reliable repairs.
Understanding Silicone Glue: Composition and Properties
Silicone glue is a versatile adhesive known for its strong bonding properties. Its composition primarily involves silicone polymers, which provide flexibility and durability. This unique structure allows for great adherence to various surfaces, including metal, glass, and ceramics. According to the American Adhesive Association, silicone adhesives can withstand high temperatures and resist moisture effectively, making them suitable for both indoor and outdoor projects.
One of the notable properties of silicone glue is its ability to remain elastic even after curing. This elasticity is particularly beneficial in applications subjected to movement or vibration. A 2022 industry report highlighted that silicone adhesives maintain their bonding strength over time, with many lasting over a decade when applied correctly. However, users must understand that not all silicone glues are created equal. Variations in formulation may lead to differences in performance, so it is essential to select the right type for your specific needs.
While silicone glue offers excellent advantages, there are challenges too. For instance, surface preparation is crucial for optimal adhesion. Any dirt or oil can hinder bonding. Additionally, some silicone glues may require specialized curing conditions. In some cases, the final bond may not achieve expected strength if not applied properly. Understanding the composition and properties of silicone glue can help avoid these pitfalls, ensuring effective repairs.
Applications of Silicone Glue in Various Industries
Silicone glue is a versatile adhesive used in many industries. Its flexibility and waterproof nature make it ideal for various applications. In the construction industry, silicone glue bonds materials like glass, metal, and wood. It creates strong seals for windows and doors, reducing energy loss. This adhesive withstands temperature fluctuations, which is crucial for outdoor projects.
In the automotive sector, silicone glue is used for repairing parts and sealing components. It can bond rubber and plastic, which are common in vehicle interiors. Mechanics appreciate its durability and resistance to chemicals. However, improper use can lead to weaker bonds, so precision is important.
In electronics, silicone glue protects sensitive components from moisture and dust. This application ensures reliability in devices. Yet, users must be cautious; excess glue can create short circuits. The balance between ample adhesion and avoiding over-application can be challenging. Adopting careful practices can significantly improve repair outcomes.
Applications of Silicone Glue in Various Industries
Step-by-Step Guide to Preparing Surfaces for Silicone Adhesion
When preparing surfaces for silicone glue adhesion, cleanliness is crucial. Studies show that 90% of adhesive failures stem from improper surface preparation. Start by removing dirt, dust, and grease. Use isopropyl alcohol for optimal results. A clean surface ensures better bonding, enhancing repair strength.
Surface roughness significantly affects adhesion. For smooth surfaces, lightly sand them to increase texture. This method boosts the surface area for the glue, leading to stronger bonds. Aim to create a roughness that feels slightly gritty to the touch. Carefully following this step is vital; a mistake can result in weak repairs.
Tips: Always conduct a small test. This can help gauge adhesion strength before committing to larger projects. A little prep work can save time and effort in the long run. Be mindful of temperature and humidity too. Ideal conditions improve the performance of the silicone glue. Time and attention during preparation yield far more reliable results.
Techniques for Applying Silicone Glue for Optimal Bonding
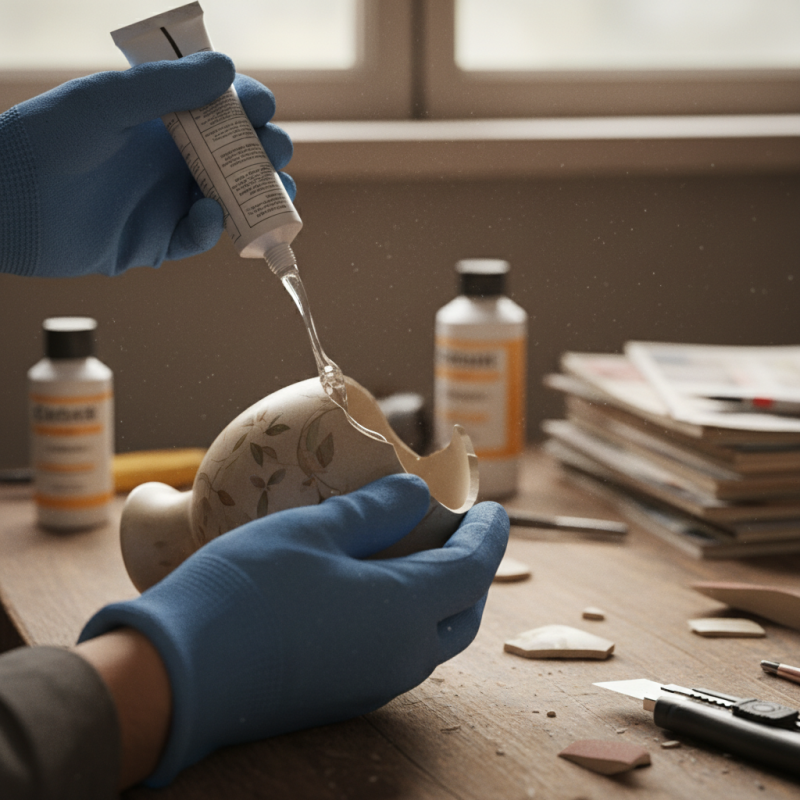
When applying silicone glue, proper techniques enhance the bond strength. Start by cleaning the surfaces well. Dirt and oil can weaken adhesion. Use rubbing alcohol or soap and water for cleaning. Ensure the surfaces are dry before applying the glue. This step is crucial for a lasting repair.
Next, consider the application method. A caulking gun works well for larger areas, while a small tool or fingers can be effective for smaller spots. Squeeze the glue evenly for a smooth layer. Avoid over-applying, as excess glue can create messy repairs and slow curing. After application, allow it to cure fully. Do not rush this process; drying times can vary widely.
Finally, reflect on your repairs. If the bond fails, identify what went wrong. Was the surface cleaned properly? Did you apply enough pressure? Consider these questions to improve future applications. Silicone glue is forgiving, but mastery comes with practice. Keep experimenting for better results.
How to Use Silicone Glue for Strong and Lasting Repairs? - Techniques for Applying Silicone Glue for Optimal Bonding
| Technique | Description | Recommended Uses | Curing Time |
| Surface Preparation | Clean and dry surfaces thoroughly to ensure optimal bonding. | General repairs on various surfaces. | N/A |
| Application Technique | Apply evenly using a caulking gun or nozzle for better control. | Sealing joints or gaps. | 24 hours for full bond. |
| Clamping | Use clamps to hold materials together while curing for stronger adhesion. | Fixing larger items under stress. | 24-48 hours. |
| Final Touches | Smooth the surface with a wet finger for a clean finish. | Visible repairs or finishes. | N/A |
Maintenance and Care for Long-Lasting Silicone Glue Repairs
Silicone glue is known for its remarkable adhesion and flexibility. To ensure your silicone glue repairs are long-lasting, proper maintenance is key. After applying silicone glue, allow sufficient curing time. The typical cure time can be around 24 hours, but full strength might take even longer in humid conditions. According to a report by the Adhesive and Sealant Council, moisture plays a vital role in the curing process, influencing final performance.
Regularly inspect your repairs for any visible signs of wear. Over time, silicone can degrade due to exposure to UV rays and extreme temperatures. Reapply adhesive if you notice cracks or peeling. It is recommended to keep the surfaces you repair dry and clean. Dirt or moisture can weaken the bond, leading to failures.
Tips: Use a small brush to apply a thin layer of silicone glue. This helps in reaching tight spots effectively. For best results, make sure the surfaces are perfectly aligned before the glue sets. Store any unused glue in a cool, dry place to prolong its shelf life.
Remember that every repair teaches you something. Reflect on what worked and what didn’t during your previous applications. Adjusting your technique can lead to stronger, more reliable results in future projects.